Game Engine Explorations: Creating the Window and rendering a simple mesh
At this point, I can take the project to the graphical world. In this post, I will describe how the engine is creating and handling the window. I will also introduce an early model of the shader program and a simple mesh to render a rectangle in the window.
Adding new dependencies: GLFW and GLAD
I want this project to compile in both Windows and GNU/Linux platforms. I would also like in the future to move the rendering pipeline from OpenGL to Vulkan. Because of this, I chose GLFW to create and handle windows. I forked the project from the official Github repo to add my own premake file. This premake file uses filters to include the implementation specific source files:
-- sources/engine_lib/external/glfw/premake5.lua
   filter "system:linux"
      pic "On"
      systemversion "latest"
      files {
         -- Linux files
      }
      defines {
         "_GLFW_X11" -- Define platform
      }

   filter "system:windows"
      systemversion "latest"
      files {
         -- Windows files
      }
      defines {
         "_GLFW_WIN32", -- Define platform
         "_CRT_SECURE_NO_WARNINGS"
      }
The other library that I need is Glad. It is a generated OpenGL loader library. There is a web service that generated the proper source files. After that, it is only needed to add it to the engine project as another static library. I generated one for the OpenGL version 4.6.
Creating a Window
There are many questions when it comes to creating a window: how big should it be? Should it have a title? What color is the background? Is it resizable? Etc. I want to keep all these descriptions in a single struct. That way, I could in the future load these settings from the main function arguments, or from a file. For now, the struct has the minimal settings:
// engine_lib/core/window_manager.h
struct WindowProperties {
    std::string Title;
    unsigned int Width;
    unsigned int Height;
    float AspectRatio;
    std::array<float, 4> DefaultBackground = {0.0f, 0.0f, 0.0f, 1.0f};

    WindowProperties() = delete;
    WindowProperties(const std::string& title = "Application",
                     unsigned int width = 800, unsigned int height = 600);
};
The Application layer should provide these settings by overriding this private function:
// engine_lib/core/application.h
class Application
{
   // ...
   private:
    virtual const WindowProperties& getWindowProperties() const = 0;
    // ...
};
In comparison to other APIs, OpenGL is easy to initialize and use. The WindowManager class controls both the graphical window and the OpenGL context management. It may be that in the future I will separate this class, in the case I introduce a different rendering API.
// engine_lib/core/window_manager.h
class WindowManager
{
   public:
    bool initialize(const WindowProperties& properties);
    void terminate();

    void processEvents();
    void swapBuffers();

    bool shouldWindowClose() const;

   private:
    GLFWwindow* m_Window = nullptr;

    static void glfwErrorCb(int error, const char* desc);
};
This class is also declared and managed as a component from the Application class. The application main loop will call the functions processEvents, swapBuffers, and shouldWindowClose. The main loop, also called game loop, is the application’s orchestrator. It takes execution control to call the logic code and render the application.
Adding the game loop
I do not plan to have physics simulation yet, so I will keep the game loop as simple as possible. When I get into physics simulations, I will follow the advice from the popular article: “Fix your timelines”. This first game loop will measure the elapsed time and pass it to an update function.
// engine_lib/core/application.cpp
void Application::run()
{
    using namespace std::literals;
    using Clock = std::chrono::steady_clock;
    using duration = std::chrono::duration<double>;
    using time_point = std::chrono::time_point<Clock, duration>;

    time_point current_time = Clock::now();

    const std::array<float, 4>& default_bg = getWindowProperties().DefaultBackground;

    while (!m_WindowManager.shouldWindowClose()) {
        m_WindowManager.processEvents();

        time_point new_time = Clock::now();
        auto delta_time = new_time - current_time;
        current_time = new_time;

        doUpdate(delta_time);

        glClearColor(default_bg[0], default_bg[1], default_bg[2], 1.0f);
        glClear(GL_COLOR_BUFFER_BIT | GL_DEPTH_BUFFER_BIT);

        doRender();
        m_WindowManager.swapBuffers();
    }
}
Another behavior that I do not find ideal is to delegate the rendering to the Application layer. I will create a proper rendering manager, but that can wait. For now, I have declared these virtual functions:
// engine_lib/core/application.h
class Application
{
   // ...
   private:
    virtual void doUpdate(std::chrono::duration<double> delta_time) = 0;
    virtual void doRender() = 0;
    // ...
};
Implementing shaders and meshes
OpenGL uses the GLSL language to create shaders. They can be compiled in runtime. For simplicity, that is why I am going to do in this first iteration. I declared a namespace to compile a shader program and get an ID for it.
// engine_lib/rendering/shader_program.h
typedef unsigned int ShaderProgramID;

namespace ShaderProgram
{
[[nodiscard]] std::pair<bool, ShaderProgramID> createNewShader(
    const std::string& vertex_shader_code,
    const std::string& fragment_shader_code);

void bindShader(ShaderProgramID shader_program);
void terminateShader(ShaderProgramID shader_program);

}  // namespace ShaderProgram
The createNewShader takes the code for both shaders. In the future, I will create a resources manager that can read files from disk. That way, the application layer can register a shader and the engine layer will compile it.
// game_app/game_app.cpp
bool GameApp::doInitialize()
{
    std::string vertex_shader =
        "#version 460 core\n"
        "layout(location = 0) in vec3 aPos;"
        "layout(location = 1) in vec2 aUVs;"
        "out vec2 UVs;"
        "void main() {"
        "gl_Position = vec4(aPos.x, aPos.y, aPos.z, 1.0);"
        "UVs = aUVs;"
        "}";
    std::string fragment_shader =
        "#version 460 core\n"
        "in vec2 UVs;"
        "out vec4 FragColor;"
        "void main() {"
        "FragColor = vec4(UVs.x, UVs.y, 0.0f, 1.0f);"
        "}";

    auto [init, shader_id] =
        ShaderProgram::createNewShader(vertex_shader, fragment_shader);
    if (!init) {
        TM_LOG_ERROR("Could not create shader");
        return false;
    }

    m_ShaderProgram = shader_id;
    // ...
    return true;
}
The next thing that I need is a basic Mesh class. This call will accept a “hard coded” format for the vertex input. For this, I mean that the vertex input data consists of positions and UV points:
// engine_lib/rendering/mesh.h
struct MeshInstanceID {
    unsigned int VertexAttrArray;
    unsigned int IndexSize;
};

struct Mesh
{
   public:
    Mesh() = default;  // TODO: consider delete
    Mesh(unsigned int vertex_size, unsigned int index_size);

    void addVertex(float x, float y, float z, float u, float v);
    void addIndex(unsigned int index);

    std::vector<float> Vertices;
    std::vector<unsigned int> Indices;

    [[nodiscard]] static MeshInstanceID createInstance(const Mesh& mesh);
    static void terminateInstance(MeshInstanceID mesh_instance_id);
    static void renderMeshInstance(MeshInstanceID mesh_instance_id);

    // TODO: Make this flexible
   private:
    static constexpr int VERTEX_ATTR_POS_SIZE = 3;
    static constexpr int VERTEX_ATTR_UV_SIZE = 2;

    static constexpr int VERTEX_ATTR_STRIDE = 5 * sizeof(float);

    static constexpr int VERTEX_ATTR_POS_OFFSET = 0;
    static constexpr int VERTEX_ATTR_UV_OFFSET = 3 * sizeof(float);
};
I will make this more flexible in the future, but for now this is good enough to define a simple square mesh. This is also done in the application layer, for now:
// game_app/game_app.cpp
bool GameApp::doInitialize()
{
    // shader creation ...

    /*
     * The first three parameters of the vertex are the position
     * of the vertex itself. Here we are creating a rectangle that is
     * half the size of the screen. Notice that the origin is in the center:
     *
     *   +---------------------------------+
     *   |   (-0.5,0.5)         (0.5,0,5)  |
     *   |       +-----------------+       |
     *   |       |                 |       |
     *   |       |      (0,0)      |       |
     *   |       |                 |       |
     *   |       +-----------------+       |
     *   | (-0.5,-0.5)         (0.5,-0.5)  |
     *   +---------------------------------+
     *
     * The second two parameters are the UV coordinates. The origin here is in
     * the top left corner:
     *
     *  (0,0)       (1,0)
     *     +---------+
     *     |         |
     *     |         |
     *     |         |
     *     |         |
     *     +---------+
     *  (0,1)       (1,1)
     */
    Mesh rectMesh(4, 6);
    rectMesh.addVertex(0.5f, 0.5f, 0.0f, 1.0f, 0.0f);    // top right
    rectMesh.addVertex(0.5f, -0.5f, 0.0f, 1.0f, 1.0f);   // bottom right
    rectMesh.addVertex(-0.5f, -0.5f, 0.0f, 0.0f, 1.0f);  // bottom left
    rectMesh.addVertex(-0.5f, 0.5f, 0.0f, 0.0f, 0.0f);   // top left
    rectMesh.addIndex(0);                                // first triangle
    rectMesh.addIndex(1);
    rectMesh.addIndex(3);
    rectMesh.addIndex(1);  // second triangle
    rectMesh.addIndex(2);
    rectMesh.addIndex(3);

    m_RectMeshInstance = Mesh::createInstance(rectMesh);

    return true;
}
Putting it all together
That is all I require for now to simple render a rectangle. The rendering code only needs to know the shader program and the mesh instance:
// game_app/game_app.cpp
void GameApp::doRender()
{
    ShaderProgram::bindShader(m_ShaderProgram);
    Mesh::renderMeshInstance(m_RectMeshInstance);
}
These functions are in charge of calling the OpenGL API functions:
// engine_lib/rendering/shader_program.cpp
void bindShader(ShaderProgramID shader_program)
{
    glUseProgram(shader_program);
}

// engine_lib/rendering/mesh.cpp
/*static*/ void Mesh::renderMeshInstance(MeshInstanceID mesh_instance_id)
{
    glBindVertexArray(mesh_instance_id.VertexAttrArray);
    glDrawElements(GL_TRIANGLES, mesh_instance_id.IndexSize, GL_UNSIGNED_INT,
                   0);
    glBindVertexArray(0);
}
Executing the application finally shows some graphics:
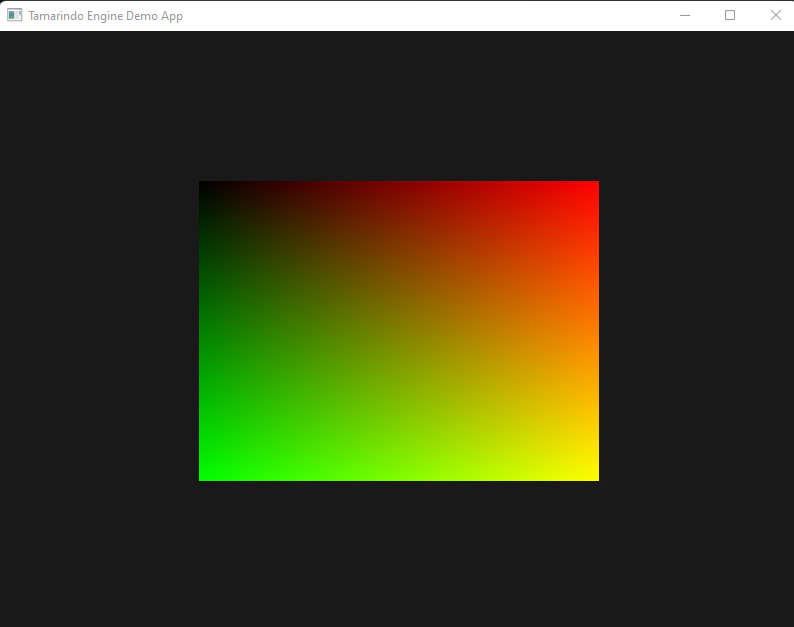
There are two things to notice here. The mesh vertices should render a square, but in the application, it looks more like a rectangle. This is because the vertex positions are in screen space, and the window’s aspect ratio is 4:3. This will get fixed once I add a proper camera system.
The second thing is about the colors of the rectangle. I am using the vertex’s UV coordinates to output the vertex color in the fragment shader. I intended to do this to test that the vertices are properly rendered. Notice again the fragment shader:
void main() {
    FragColor = vec4(UVs.x, UVs.y, 0.0f, 1.0f);
};
The top left corner of the rectangle is black because the UV coordinates are (0,0). In contrary, the bottom-right UV coordinates are (1.0, 1.0), so they completely combine red and green. The other two corners interpolate to the red and green colors. This UV coordinates will be useful later to apply textures to the meshes.
That is all for now, the application can now use the engine to render meshes with simple shader programs. I would like to have a proper resources manager before jumping to the 3D world. In the next post, I will write about 2D meshes, textures and orthographic cameras.
You can find this project on my Github, and the code from this post is in this commit.